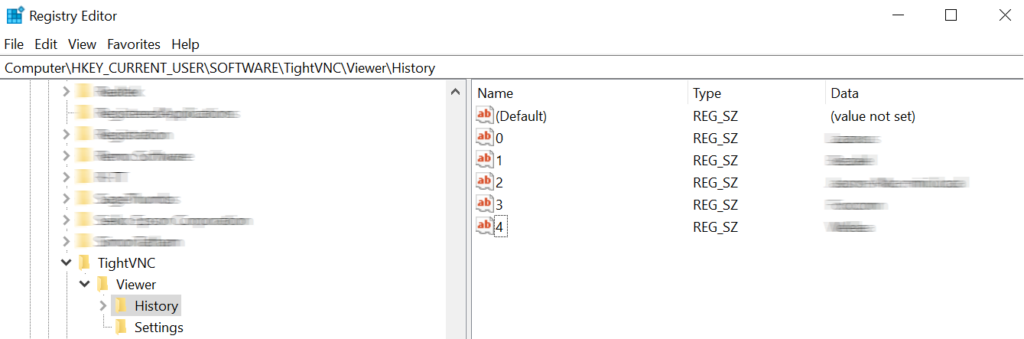
Unfortunately, TightVNC has no way to remove specific entries from the host list, so you have to remove them from the registry.
TightVNC Viewer has no built-in way to remove a single connection from its history — the only in-app option is clearing the entire list. That means losing every saved host at once and having to re-add them all from scratch, even the ones still needed. For anyone with more than a couple of saved servers, that’s a lot of unnecessary re-entry just to get rid of one stale entry.
The list is actually stored in the Windows registry, which allows individual entries to be removed without touching the rest.
Where it’s stored:
HKEY_CURRENT_USER\Software\TightVNC\Viewer\History
Each numbered subkey (0, 1, 2…) is one saved connection, with a HostName value identifying the server.
⚠️ Warning: The registry has no undo and no confirmation beyond what’s on screen. Deleting or renaming the wrong key can affect more than connection history — misuse elsewhere in the registry can impact Windows stability or booting. Export the History key first (right-click → Export) before making changes, stay within the exact path above, and confirm a subkey (left pane) is selected rather than a value (right pane) before deleting anything.
Steps:
- Open Registry Editor (
Win+R, typeregedit, Enter). - Navigate to the path above.
- Click through the numbered subkeys, checking each
HostNamevalue to find the one to remove. - Right-click that subkey → Delete.
- Renumber what’s left with no gaps. TightVNC reads the list sequentially and stops at the first missing number — so a deleted key in the middle makes every entry after it disappear from the dropdown, even though they’re still in the registry. Fix by selecting each remaining subkey, right-clicking → Rename (or pressing
F2), and retyping so the sequence runs 0, 1, 2, 3… without gaps. - Close Registry Editor, reopen TightVNC Viewer, and confirm the list looks right.
The built-in “clear list” option is all-or-nothing and forces re-adding every host afterward. Editing the registry directly allows removing just the unwanted entries — as long as the remaining ones are renumbered sequentially to keep TightVNC reading the full list correctly.
Share Your Two Cents