While testing the free Shotcut Video Editor, I ran into some compatibility issues with programs like Camtasia and Vegas Video Studio. With help from ChatGPT, I put together this simple step-by-step guide for editing VHS recordings converted to DVD using a Panasonic VHS/DVD recorder and exported to MP4 with Uniconverter.
Shotcut Complete Workflow – New Project → Export MP4
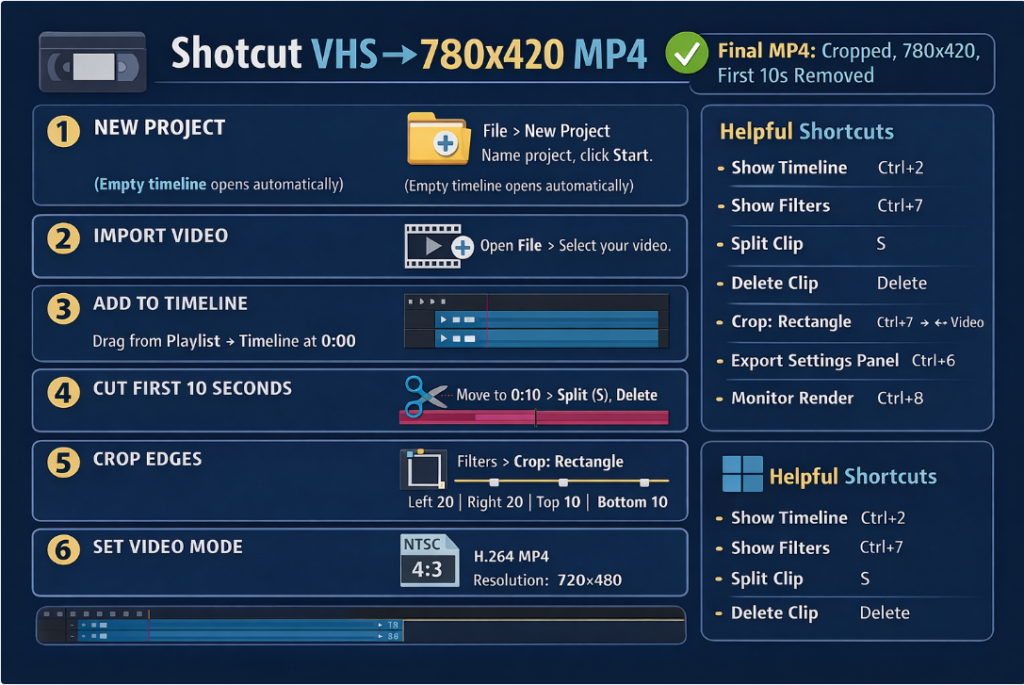
Create a New Project
- Open Shotcut.
- Click File → New Project.
- Set:
- Project Folder: where all project files will be stored.
- Project Name: choose something meaningful.
- Video Mode: (optional now, can set later) leave Automatic for simplicity.
- Click Start.
Your project is now ready with an empty timeline.
2. Import Media
- Click Open File → select your MP4 (or any media file).
- The video will appear in the Preview Window.
- Optional: Open View → Playlist to see all imported files in a panel.
- This is useful if you plan to work with multiple clips.
3. Add Media to Timeline
- Open View → Timeline (if it’s not visible).
- Drag the video from Playlist (or Preview) onto the Timeline.
- You should now see V1 (video track) and A1 (audio track).
- Ensure the clip starts at 0:00 on the timeline.
4. Basic Editing – Remove Sections
To remove the first 10 seconds (or any unwanted portion):
- Move the playhead (vertical blue line) to the end of the portion you want to remove (e.g., 10 seconds).
- Click the clip in the timeline to select it.
- Press S to split at playhead.
- Click the unwanted portion (first 10 seconds) → press Delete.
- Drag the remaining clip to the start of the timeline (0:00) if needed.
You can split multiple times to remove other unwanted sections.
5. Apply Filters / Crop Video
- Select the clip in the timeline.
- Open View → Filters (or press Ctrl+7).
- Click + → Video → Crop: Rectangle.
- Adjust Left / Right / Top / Bottom sliders to remove unwanted edges.
Optional:
- Add Deinterlace → YADIF if your source is interlaced VHS.
- Add Reduce Noise → HQDN3D (light settings) for VHS cleanup.
6. Set Video Mode (Optional for VHS)
- Click Settings → Video Mode → NTSC → NTSC DV (720×480) 4:3
- This ensures the timeline matches VHS/DVD resolution and aspect ratio.
- Useful if preserving original VHS proportions.
7. Configure Export Settings
- Click Export (top toolbar).
- The Export panel appears on the left.
- Choose a preset: H.264 Main Profile → MP4 (good default).
- Optional advanced settings:
- Resolution: 780 × 420
- Frame rate: 29.97 fps (or match your source)
- Scan mode: Progressive
- Audio tab:
- Codec: AAC
- Bitrate: 128–192 kbps
8. Export the Video
- Click Export File at the bottom of the panel.
- Choose filename and location → click Save.
- Open View → Jobs (Ctrl+8) to monitor progress.
- Wait until Finished — the MP4 is now playable.
Tips & Notes
- Timeline = everything you want in final video. Only clips on the timeline are exported.
- Split (S) → Delete = Shotcut’s “cut” tool. There’s no select-and-cut tool like some editors.
- Always check the playhead position before splitting.
- Crop filter only applies to selected clip; make sure clip is highlighted.
- Export panel must be used — File → Export → Save As alone will NOT produce a real MP4 in newer versions.
This workflow covers everything you need for a simple VHS workflow:
- Start a project
- Import media
- Cut/remove unwanted sections
- Crop edges
- Set video mode (optional)
- Export to playable 780×420 MP4
Quick Reference Table
| Action | Shortcut / Location |
|---|---|
| Show Timeline | View → Timeline |
| Show Filters | View → Filters (Ctrl+7) |
| Split Clip | S |
| Delete Clip | Delete key |
| Crop | Filters → + → Video → Crop: Rectangle |
| Export Panel | Export (top toolbar) |
| Monitor Render | View → Jobs (Ctrl+8) |
Tips for VHS
- Crop a few pixels on left/right to remove black edges.
- Crop top/bottom if there are tracking lines or border noise.
- Use Deinterlace for interlaced VHS sources.
- Keep timeline start at 0:00 for clean export.
Share Your Two Cents