One problem I’ve had with my Mazda Protege is that Mazda decided to use cheap plastic in their design for automatic door locks, door handles and window regulators. In fact, I’ve had to replace the driver side, front window regulator twice, the driver side, rear locking mechanism twice, the passenger side, rear locking mechanism once and the driver’s side, front interior door handle once. Perhaps it’s not so much cheap as it is poor engineering after all Southern Arizona does average over 100° for several months in the summer – not a good complement to plastic.
Whatever the reason, when the driver’s side window regulator went out again on my 2003 Mazda Protege I was faced with a decision:
- Take the car to the Mazda Dealer and have them repair the window regulator
- Order a new power window regulator and replace it myself
After weighing the cost in wasted time with the dealer and the remaining length of my extended warranty I decided to do it myself. I figured I’d be repairing the windows again in a few years so might as well learn how now; I’ve already had to have the dealer fix two power locks and three power window regulators on this vehicle.
The first step was to get the part. I was impatient, so I way overpaid by picking up the power window regulator from the dealer. Ironically just purchasing the part from the parts counter took over an hour. It was also shocking to see that for $160 the window regulator didn’t even come with a motor!
If I had been a bit more patient, I could have ordered the replacement power window regulator with motor for my 2003 Mazda Protege from Amazon for a little as $62 but the idea of driving around Tucson without being able to roll up or even close my driver’s side window wasn’t an appealing proposition.
This tutorial is for the 2003 Mazda Protege driver’s side, front Power Window Regulator. The Passenger side is similar, but this tutorial will be more or less useless for the rear doors.
*Disclaimer – This tutorial is for general informational purposes; you break your door, it’s your own fault.
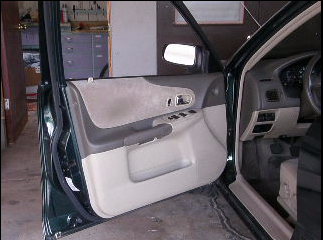
Step 1 – The most obvious, open your Protege’s door. There is no need to disconnect the battery cables but you may want to turn off the cabin lights if they are set to turn on when doors are opened. Chances are the replacement of the Power Window Regulator won’t last long enough to drain the battery. It took me about an hour because I had to mount the old motor onto the new regulator.
 Step 2 – Remove the plastic button clip on the door jamb. Gently pull out the center of the clip with your fingernails or other soft, thin object. Once the head comes forward, the clip will pull right out.
 Step 3 – Remove the screw located under the door handle on the right front side with a medium sized Phillips Head Screw Driver.
 Step 4 – Gently twist the handle up and to the left (right if passenger side door), and it will pop loose.
 Step 5 – Remove the two Phillips Head screws located in the holes revealed when the door handle was removed.
 Step 6 – Remove the power accessory switch console. Gently pry the broad end of the console loose with a soft flat object so as not to damage the surface of the door cover or console.
 Step 7 – Remove the wiring clips from the switch console by pressing in the plastic clip locks and pulling away from the console.
 Step 8 – Remove the plastic button clip on the top, inside right of the door. Gently pull out the center of the clip with your fingernails or other soft, thin object. Once the head comes forward, the clip will pull right out.
 Step 9 – Gently remove the black plastic triangle from the top right corner of the door, opposite the rearview mirror, by pulling from the front point towards the door jamb.
 Step 10 – Remove the door panel by gripping the bottom and firmly, but gently pulling upward until it pops loose. Then pull out from the bottom and lift the panel away.
Update thanks to Russ’ Comment below: When removing the door panel, it is paramount to carefully detach the plastic retaining clip that attaches the metal rod to the door handle.
 Step 11 – There is a piece of foam that attaches to the top, right back of the panel that may come loose. If it does, press it back in place using the glue marks on the back of the panel to determine the proper positioning.
 Step 12 -Remove the plastic weather guard carefully so it can be reused. Be careful not to get the sticky black adhesive on your upholstery.
 Step 13 – Gently remove screws holding the window to regulator slider arm attached to the base of the window.
 Step 14 – Grasp window and pull upward, then outward and gently remove from the door frame.
 Step 15 – Remove brass colored screws from door holding the Protege Power window regulator and motor in place. Note the red dots for approximate positions of screws (Click Image to Enlarge).
 Step 16 – Disconnect the motor’s power coupler from the doors wiring harness.
 Step 17 – Guide the regulator assembly towards the large hole in the door on the bottom left (bottom right on passenger side door).
If your new regulator comes from the dealer, you will need to mount your existing motor on to the new Power Window Regulator.
1) Remove the three screws from the regulators metal tripod shaped base 2) Mount the motor on the new regulator’s tripod shaped base, in the same orientation as the motor was mounted on the original power window regulator.


 Step 18 – Install the power window regulator and window by doing steps 13 through 17 in reverse, in the reverse order (17,16,15,14,13): Insert window regulator through hole, position, replace retaining screws, connect the power supply to door’s wiring harness, replace the window.
Then reattach the switch console and test the window prior to doing steps 12-1 in reverse. And that’s all there is to changing a 2003 Mazda Protege Power Window Regulator.
Today is Saturday Sept 1st 2012. My 22 year old daughter was visiting from out of town in her new used 1999 Mazada Protege and the driver window failed after being in town for an hour. 5pm labor day weekend and no service till Tuesday. I found this tutorial and replaced the regulator in an hour and a half. Thank you so much. Window works perfect!
This tutorial is even better than a factory service manual. It was a piece of cake to replace! Thank you, thank you! I wish I could have waited and got one of these on e-bay for around $60-80 but I had to pay $119 at Auto Zone.
Glad it helped, that’s why I put these posts up; the only manuals I could find were digital and who wants to get oil, grease and battery acid all over their iPhone, iPad ot laptop?
Dude! Thank you for posting this tutorial!
I have an 03 Protege so it was spot on!
I purchased the full regulator with motor assembly for about $90 and saved over $100 in labor by following your instructions. Installation was super easy and only took about 30 minutes.
Thanks again!
Glad it saved you time, took me nearly three hours to figure it out the first time!
Jason, thank you so much for this guide. It helped quite a lot! I used it to replace a regulator in my 2000 Mazda protege.
If anyone is skimming the comment section and weighing doing this by themselves- it’s definitely doable. Make sure you have the right sized screw-drivers and a metric ratchet set. It can help to have someone else remove the plastic coating or pull the door off once all screws are released, but it is not strictly necessary. Even if you’re a complete newbie like me, you can do it!
It really should have been a recall part, I had three replaced when it was under warranty and have had to do two myself since the warranty expired. Will be posting one for the power locks soon 3 out of four have failed.
Thank you for the tutorial! These are excellent instructions and worked very well for my Mazda Protege 2000! I bought a new window regulator with a motor on Amazon for $66 and it took me about an hour to replace it using these instructions. I don’t know much about cars and never took any door apart, so it was a great and satisfying experience!
However, there is one important thing that I would add for Step 10: When removing the door panel, it is paramount to carefully detach the plastic retaining clip that attaches the metal rod to the door handle. If you break the clip, you will either need to get a new one (you can buy a pack of 25 retaining clips on Amazon for about $10) or use a metal paper clip instead (check my comments at http://purelysupp.com/2011/07/21/change-protege-door-handle/). Also, when removing the door panel, make sure you also remove the small wiring clip for the lock that is attached to the door panel from the inside. I didn’t notice the wiring clip when I was removing the door panel and almost broke it.
Thanks for the note, I’ll update the post – I just had to do the passenger side door the other day and remembered what a pain that little clip can be.
I slammed my door yesterday out of sheer anger(got a ticket) and my window stopped working. I researched and found that it might be the regulator, which then led me to this site. YOU! ARE! THE! MAN! Thank You!
Don’t feel bad, I’m always warning the wife not to slam the doors (not that we are always fighting); the entire thing is a total scam. One 10 cent piece of plastic so they can sell you an entire new mechanism – Total recall part in my book!
Dude. Thank you for this. You’re racking up a helluva store of *car-ma* for helping us all. Cheers!
The driver side window of my son’s 03 Protege5 dropped about 6 inches today. A stupid plastic part on the top of the regulator broke. Was thinking of taking it to Mazda tomorrow and finding out how to deal with all the logistics of having a car out of service when I found this webpage. Luckily I found a complete regulator with motor in stock on a Sunday! 30 minutes later, the regulator was installed. Great instructions.
This just saved my bacon. Thank you for the info god bless
Just replaced another one of these last week, I think that makes it 5 total. It seems like the bottom clip should really be a recall part for OEM regulators. All 5 replacements had the same clip break, so I switched to after market replacement regulators and so far they have proven to be much more durable. I also discovered you can get out of box parts on Amazon. My last one only cost $30.
HELP!
There’s been a part design change.
The original driver’s side window regulator on my daughter’s 03 Protege had only one connector with 2 wires for the motor.
The new one has limit switches that stop the motor when the regulator reaches the end of travel. Now there are two connectors with 7 wires. How do I hook this thing up?
Unfortunately, I can’t be much help as I haven’t seen that part or had that experience.
I do have a couple of thoughts:
Thank you so much for this tutorial. Today is 10/18/15. I’m a 56 year old with no experience whatsoever as far as removing a door panel and working on parts inside the door. Yet I was able to do this job in a couple of hours thanks to your pictures and step by step instructions. Works perfectly! I was able to buy the Dorman part on Ebay for $57 rather than paying $110 at the local aftermarket parts stores. And then saved the labor charges completely. Dealerships wants $400 for the job. Local shade tree mechanic wanted $225-$250. So I saved a bunch of money! Thanks!
Hi,
I have the same Mazda 323 Protege 2001
my issue is in the right front window.
What if the motor is damaged in widows close position?
So, How can I unscrew the screws of the bar which holds to window’s glass?
Soubhi Sabbagh
GSM +963944416832 (Whatsapp)
drsoubhi@gmail.com
You should be able to carefully push the window back up (may take two people). Place palms on both sides of the glass and press in, then gently pull upward.
Well I ended up following these instructions figuring that the part I had ordered was correct. Turns out the window regulator I purchased was an updated version, for 2002 and 2003 mazda proteges, not my 2001. After taking the time to install it I noticed that the plug is different (the plug coming from the motor that goes into the female connector connected to the door). The plug on the new regulator is 5pin (6 prong) and the old one was just 2 pin.
My question is does anyone know if I can find an adapter or perhaps rewire it myself somehow? I’d prefer to have the updated model as I think it uses better parts, if I have to simply send window regular back and purchase the correct one I am willing to do so but if anyone knows of a solution to my rather specific problem I’d figure I’d try my luck.
I know it’s a bit late but…
If the motor was working you can pull the old motor and switch it with the motor on the new regulator, just be careful not to mess up the wires on the pulley.
God bless you sir for posting this!!! Still took me about 3 hours total time but, you made it so easy to fix. The total cost for the regulator was $87 out the door. It feels so good to save the extra money I would have spent on labor. Thank you!!!